Search

Follow The following quilting patterns are from external sources and are not created by me. I have provided the links to the original designers who have kindly offered their patterns for free. Please direct any inquiries about the quilting techniques to the respective designers.

The Lattice Block - Tutorial

The Lattice Block - Tutorial
The Lattice Block
This block is a quick and easy block that can be very visually striking when the right colour/print combinations are made.

The block pictured above is made up of two of my favourite teal fabrics.
The instructions in this tutorial will make one unit that is then arranged as one of 16 to create the lattice block.

Full post: The Lattice Block

Beach House Baby Quilt - Tutorial

Beach House Baby Quilt - Tutorial
Beach House Baby Quilt
For the hexagons, I found this cute charm pack of "Beach House" by Kate Nelligan for Moda. I have had it since the spring. And now that summer's over, I figured it could help revive thoughts of those days spent down at the beach.

Machine Sewn Hexagons Tutorial

Machine Sewn Hexagons Tutorial
Machine Sewn Hexagons
Below, you will find a tutorial for sewing whole hexagons by machine.
This is also part 2 of the Oblongagonalong Quilt Along instructions.

Full post: Sewn Hexagons

45 Free Jelly Roll Quilt Patterns

Free Jelly Roll Quilt Patterns
Jelly Roll Quilts
If you've ever succumbed to the temptation of a jelly roll (and we're not talking about donuts), you're probably in need of some creative jelly roll quilt ideas to use up all those 2-1/2" strips you have been collecting! You'll find tons of projects you haven't thought of yet in this collection of 45+ Free Jelly Roll Quilt Patterns.

Jelly Roll Quilt Patterns

Jelly Roll Quilt Ideas
Jelly Roll Quilt Patterns
Jelly roll quilts are easy to make and stitch together in a flash. Here are a few of my favorite free patterns to help you stitch up a storm.

Full Post: Jelly Roll Quilt

The American Spirit Quilt - Free Pattern

The American Spirit Quilt - Free Pattern

The quilt has 12 blocks, each twelve inches square, with a three inch border. Finished size is
42x54 For a larger quilt you can make additional blocks or add different borders to expand it.

There are 2 star blocks, 4 striped blocks, 2 cross blocks, 2 tower blocks and 2 butterfly blocks.
All except the butterfly blocks can be cut and assembled from simple strips and squares. The
butterfly block pattern is included for paper piecing. If you prefer to use conventional piecing,
copy the block diagrams and add 1/4 seam allowance around each finished size area.

Use red and red prints, blue or blue prints, white or white on white prints and gold/yellow as the
main colors. The towers can be of a wide variety of colors.

Cutting and sewing instructions:

For the four Striped Blocks:

Cut eight pieces of red or red print 4 1/2 x 12 1/2. Hint: If you cut the strips 13 long and trim
the finished blocks, you won’t have to worry about getting each exactly lined up.

Cut four pieces 4 1/2 x 12 1/2 of white or white on white print.

For each block, sew red, white, red together along the long sides. Trim to 12 1/2 square.
Make four.

For the two Star Blocks:

Cut eight squares 4 1/2 x 4 1/2 of white or white on white print.
Cut four squares 4 1.2 x 4 1/2 of blue or blue print
Cut four squares 4 7/8 x 4 7/8 of white or white on white print and cut in half diagonally
Cut four squares 4 7/8 x 4 7/8 of blue or blue print and cut in half diagonally

Sew one triangle of white to one triangle of blue sewing along the diagonal using a scant 1/4:
seam allowance. Trim to 4 1/2 square. Repeat to make 8 total.

Assemble nine-patch as follows (refer to diagram for proper placement of the blue/white blocks):
Top row: white, blue/white, white.
Middle row: blue/white, blue. blue/white
Bottom row: white, blue/white, white

Make two nine patch star blocks.

For the Tower Blocks

Cut six pieces 2 1/2 x 12 1/2 of white or white on white. (note: you might want to start with
13 strips and trim them later).

Cut 74 pieces each 1 1/4 x 3 1/2 from multi-colored fabrics. We chose a variety of colors and
prints to symbolize the many different nationalities and ethnic groups affected by the tragedies of
September 11.

Sew 16 pieces together along the 3 1/2 side to make a strip 12 1/2 long. When selecting colors,
just make sure that the end colors are different on each, so your don’t get two floors of the
same color touching where the blocks meet. Repeat tower segments.

Sew the blocks together white, tower, white, tower, white, sewing along the long sides to form
blocks 12 1/2 square.

For the two Cross Blocks:

Cut eight pieces 6 1/2 x 3 1/2 of red or red print
Cut four pieces 6 1/2 x 2 1/2 of blue or blue print
Cut two pieces 6 1/2 x 2 1/2 of white or white on white
Cut four squares 3 7/8 x 3 7/8 of blue or blue print. Cut in half diagonally.
Cut four squares 3 7/8 x 3 7/8 of white or white on white. Cut in half diagonally.

Assemble as follows:

Part A
Stitch long red strip to long blue strip to white strip to blue strip to red strip.

Part B
Stitch one blue triangle to one white triangle using scant 1/4 seam, sewing along the diagonal.
Make four for each block (8 total)

Part C
Stitch one blue/white to the short end of one red strip. Stitch another blue/white to the other
short end of the red strip. (Check the diagram for proper placement of the blue/white squares
the goal is to put the blue in the outside corners of the block.)

Stitch one Part C vertically to the side of Part A. Refer to diagram.
Stitch one Part C vertically to the other side of Part A.

Make two of these blocks. You can use the center white section to write something  a date,
your name, the name of someone or an organization you want to honor, a prayer. We recommend
using a Pigma Pen and pressing to heat set it. You may want to do the writing before you assemble the block, in case you want to change the written portion.

For the two butterfly blocks, use the paper piecing pattern. Make two. If you prefer conventional
piecing, make templates from the finish lines on the paper piecing diagrams and add 1/4 seam
allowances. There are four six inch sections. Assemble them as shown in the diagram.


These paper piecing patterns each make a six inch block. Assemble the four to make one butterfly
block. You will need to make two butterfly blocks for the quilt. The Gold or Yellow is the
background fabric used in all four segments. The top wings are shown in the diagram as a blue
and gold print.


Assemble the quilt as follows:

Top Row from left: Star, Stripes, Stripes
Second row: Cross, Towers, Butterfly
Third row: Butterfly, Towers, Cross
Fourth row: Stripes, Stripes, Star

Add three inch borders of blue or blue print. You can miter the corners or do straight pieces.

For a three inch border cut two pieces, 3 1/2 x 42 1/2, and two pieces 3 1/2 x 48 1/2.
Sew the 48 1/2 pieces to the two long sides of the quilt. Sew the 42 1/2 pieces to the top and
bottom. For mitered corners, add three inches to each length of border fabric.

Add batting, backing, quilt or tie, then bind.

Chain Links Quilt Pattern

Chain Links Quilt Pattern
Chain Links
This Quilt pattern is available to download

Download Pattern: Chain Links

Phoebe Bag - Tutorial

Phoebe Bag - Tutorial
Phoebe Bag 
This quilt tutorial is available for free... 

Full post: Phoebe Bag

Folded Hexagon Stars - Tutorial

Folded Hexagon Stars - Tutorial
Folded Hexagon Stars
Learn how to create stunning Folded Hexagon Stars with this comprehensive tutorial and get a free pattern to make your own unique creations. These versatile hexagons can be assembled to form a beautiful centerpiece mat, a practical table runner, or a cozy lap quilt. For the table runner, you can incorporate Insul-Bright and cotton wadding, allowing you to safely place hot plates on the runner without damaging your table. However, if you're making a lap quilt, you won't need Insul-Bright. To access the free pattern PDF file, simply follow the link below. Happy Quilting!

Butterfly Block with Tutorial

Butterfly Block with Tutorial
Butterfly Block 
This quilt tutorial is available for free... 

Full post: Butterfly Block 

Aztec Trails Quilt Pattern

Aztec Trails Quilt Pattern
Aztec Trails
This Quilt pattern is available to download

Download Pattern: Aztec Trails

a tale of two quilts

a tale of two quilts
This quilt tutorial is available for free... 


Snowman Mat Free Pattern

Snowman Mat Free Pattern
Snowman Mat
This quilt pattern is available for free... 

Antebellum Quilt Pattern

Antebellum Quilt Pattern
Antebellum 
This quilt pattern is available for free... 

Full post: Antebellum Quilt

Spiral Block Tutorial

Spiral Block Tutorial
The Photo by © Karen - The Recipe Bunny 
The spiral block is a simple but elegant design that you can create with some basic cutting and sewing skills. You can find a detailed tutorial with all the measurements and instructions at the link below. This block is perfect for adding some movement and interest to your quilts. I hope you have fun making it.

Full post: Spiral Block

Teeny Tiny Zipper Pouches - Free Pattern

Teeny Tiny Zipper Pouches - Free Pattern
Teeny Tiny Zipper Pouches
This quilt tutorial is available for free... 

Butterfly Inspired Quilt - Step by Step

Butterfly Inspired Quilt - Step by Step
Butterfly Inspired Quilt
This quilt Step by Step is available for the family ever after blog

Scrap Jar Stars - Tutorial

Scrap Jar Stars - Tutoroial
Scrap Jar Stars
I'm a big fan of upcycling and transforming old stuff into new treasures. I think it's a great way to save money and be creative at the same time. That's why I was so excited to make these adorable little stars from my scrap fabric stash. I named them my Scrap Jar Stars because they look like they came out of a jar of colorful candies.


Full post: Scrap Jar Stars

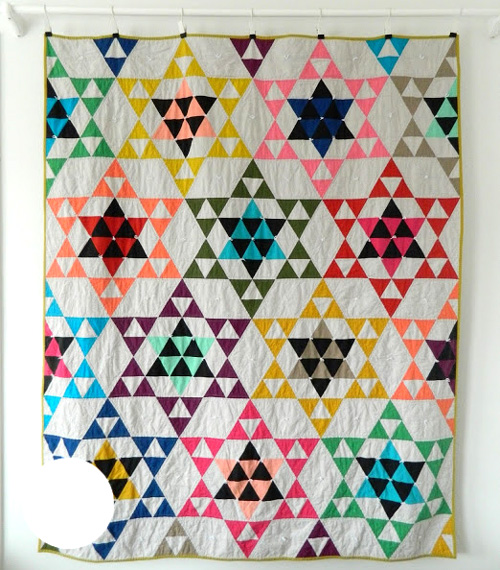
Salt Air Lattice Quilt - Tutorial

Salt Air Lattice Quilt - Tutorial
Ų„Salt Air Lattice Quilt
This quilt tutorial is available for free... 

Easy Diy Star Baby Quilt Tutorials

Easy Diy Star Baby Quilt Tutorials
Easy Diy Star Baby
This quilt tutorial is available for free...