
When we were young, one of the activities we looked forward to most in the Spring Time was kite flying. We lived in a very windy spot, and those kites could soar! This project is a reminder of those happy spring days!
The runner is fast to stitch, and could quickly be completed in an afternoon.
The runner is fast to stitch, and could quickly be completed in an afternoon.
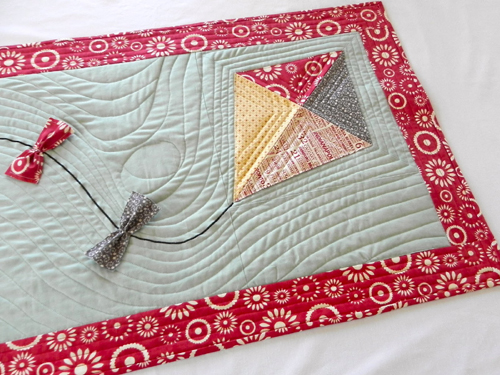
Quick Kite Table Runner
 |
| The photo above © Madame Samm - Sew I quilt now |
Finished Runner -- 22 x 41 inches.
Fabric Required:
Kites
3 fat quarters
Borders/Binding/ Small Kite Section
7/8 yd
Background
1 yard
Batting:
About 24 x 43 inches
Backing:
About 25 x 44 inches
Notions Required:
Water or Air Soluble Marker
Neutral Thread for stitching. ( I love silver grey Aurifil!)
Dark Thread for kite string -- I used black Aurifil
12.5 X 12.5 inch Square Ruler
Hand Sewing Needle
Optional:
Rick Rack or Cording with Matching Thread
My fabrics are Hometown Sweetwater for Moda Fabrics. I used solid grey for the backing, which is not shown here.

Cutting Instructions
Background Fabric:
First, square up one end.
Cut 1 Strip 17.5 inches x WOF
Sub-cut to 1 - 17.5 inch x 24.5 inch rectangle
Cut 1 Strip 13.5 inches x WOF
Sub-cut to 1- 13.5 inch x 13.5 inch square and
1 – 12.5 inch x 5.5 inch rectangle
Cut the 13.5 inch x 13.5 inch square and twice on the diagonal to make four triangles as shown.
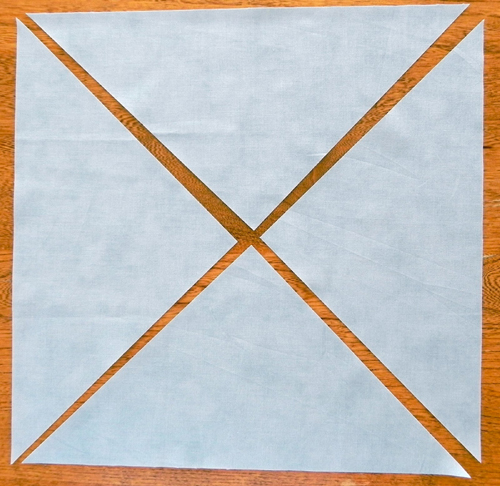
The background pieces will look like this:

Border/Binding/ Small Kite Section Fabric
Square up one side. Remove selvedges, taking care to keep at least 41 inches of length.
Cut in this order:
Binding--- 4 – 2.25 inch strips x WOF
Borders --- 3 – 3 inch strips x WOF
Sub-cut 1 strip into 2 - 17.5 inch long strips
Kite and Bows – Cut 1- 11 inch x 11 inch square
Cut 2- 2 inch x 4.5 inch rectangles

3 Fat Quarters for Kite sections and bows
(this could easily be cut from fabric remnants)
From each fq:
cut 1 - 11 x 11 inch square
cut 2- 2 x 4.5 inch rectangles

Now take all four 11 x 11 inch squares and fold in half wrong sides together and press a good sharp crease down the center!

This next step looks a bit crazy, but trust me, it works just fine!
Place the square ruler on the folded edge.
Line up the 8 3/4 mark on the left and the 5 1/2 inch line on the right.
It is important that this is accurate! If not, your kite won't have nice points where the sections join! Double check your alignment, then carefully cut!

Close up of the ruler alignment.

The small kite segments are cut exactly the same way, but with the FOLDED EDGE is lined up with the 5 1/2 inch and 6 1/2 inch marks.

Another close up of the ruler alignment.

Ready to start stitching? Let's go!
Lay out your 4 background triangles as shown. Place your folded kite sections on top, with all raw edges toward the center and folded edges toward the outside. The 5 1/2 inch side of each kite section should be along that center seam line. Be careful! It is easy to goof with the small kite sections!

Pin kite sections to the backing fabric carefully so those bias cut edges don't stretch!

Stitch 1/8 inch away from the raw edge of each kite section.
This will keep everything stable for the next step

Right sides together, pin the two small upper kite sections together.
Carefully match the points of the kite segment--this is important for a neat finished look for the kite.

The very outer edges of your background fabric might not match exactly, but don't worry if it is a smidgeon off, it will be trimmed down later.

All seams will be stitched with the standard scant 1/4 inch seam allowance.
Stitch upper kite sections together. Press the seam allowance OPEN. This is necessary due to the bulk in this area. Repeat this process with the two lower kite sections.

Join the upper and lower units of the kite block, being careful to match those center seams and outer corners of the kite sections! Pin carefully, then stitch.

Again, press the seam allowances OPEN. You might need a shot of steam or a spritz of water to make this lay flat. Turn the block over and give it a good pressing.

It's starting to get cute, isn't it?

Time to trim! Using the square ruler, trim the kite block to 12.5 x 12.5 inches square.

Use the diagonal line on the ruler to help keep the block symetrical.

The kite block should have the upper sections pointing to the upper right corner.
Next stitch the 5.5 inch x 12. 5 inch rectangle below the kite block.
Press seam allowances toward the background rectangle.
Add the 17.5 x 24.5 inch rectangle to the left side of the kite block.
Press seam allowances toward the background fabric.

Using your marker, lightly draw a gentle curve for your kite tail.
(it is hard to see in the photo)

Set your sewing machine for a very tight zig zag stitch, and using your dark colored thread, stitch over your marker line.
Tip: Practice your zig zag on scrap fabric. If it makes your background fabric pucker up, place sheets of paper behind your marker line and stitch right through it. When the stitched line is complete, the paper will peel right off the back of the runner since all the stitching perforates the paper. Easy peasy!
Optional: The kite tail could be made with baby rick-rack or narrow cording.

Add the border sections to the runner. Stitch the 17.5 inch strips to the left and right side, and the longer strips to the top and bottom. The top and bottom strips will probably be a little bit long, just trim them down, using the square ruler to be certain the corners are nicely squared up! Seam allowances on the borders should be pressed toward the borders.

This next step is vital!
Play peek a boo with the Kitty! It's important to keep the quality inspector happy!

Layer the table runner with the batting and backing. Quilt as desired.
I kept it simple with echo quilting using my walking foot. I didn't mark it so it would be a bit free form and breezy. I think the quilting looks a bit like isobars on a weather map.
Make 4 Kite Tail Bows

Take 2 rectangles, place wrong sides together, and stitch with a 1/4 inch seam allowance around the entire rectangle. (You can see this in the photo below.)
Fold the rectangle in half and finger press a crease in the center.

Using a hand sewing needle and a double thickness of thread, take large stitches across the center of the bow. Gather the fabric up tightly and knot the thread. Repeat for all four bows.

Arrange the bows on the kite tail as desired. Pin in place. Using the sewing machine, threaded with neutral thread, stitch the blows to the kite tail. Then back stitch all the way back across the bow so it is secure. Trim the threads.
Binding
Create about 140 inches of binding using your prefered method. Apply the binding to the runner, and stitch down. Press the binding toward the back of the runner and stitch by machine or by hand, whatever you prefer.
All Finished!

Use your runner to decorate your spring time table. Then go outside and fly a kite!
Happy Stitching!
This next step looks a bit crazy, but trust me, it works just fine!
Place the square ruler on the folded edge.
Line up the 8 3/4 mark on the left and the 5 1/2 inch line on the right.
It is important that this is accurate! If not, your kite won't have nice points where the sections join! Double check your alignment, then carefully cut!
Close up of the ruler alignment.
The small kite segments are cut exactly the same way, but with the FOLDED EDGE is lined up with the 5 1/2 inch and 6 1/2 inch marks.
Another close up of the ruler alignment.
Ready to start stitching? Let's go!
Lay out your 4 background triangles as shown. Place your folded kite sections on top, with all raw edges toward the center and folded edges toward the outside. The 5 1/2 inch side of each kite section should be along that center seam line. Be careful! It is easy to goof with the small kite sections!
Pin kite sections to the backing fabric carefully so those bias cut edges don't stretch!
Stitch 1/8 inch away from the raw edge of each kite section.
This will keep everything stable for the next step
Right sides together, pin the two small upper kite sections together.
Carefully match the points of the kite segment--this is important for a neat finished look for the kite.
The very outer edges of your background fabric might not match exactly, but don't worry if it is a smidgeon off, it will be trimmed down later.
All seams will be stitched with the standard scant 1/4 inch seam allowance.
Stitch upper kite sections together. Press the seam allowance OPEN. This is necessary due to the bulk in this area. Repeat this process with the two lower kite sections.
Join the upper and lower units of the kite block, being careful to match those center seams and outer corners of the kite sections! Pin carefully, then stitch.
Again, press the seam allowances OPEN. You might need a shot of steam or a spritz of water to make this lay flat. Turn the block over and give it a good pressing.
It's starting to get cute, isn't it?
Time to trim! Using the square ruler, trim the kite block to 12.5 x 12.5 inches square.
Use the diagonal line on the ruler to help keep the block symetrical.
The kite block should have the upper sections pointing to the upper right corner.
Next stitch the 5.5 inch x 12. 5 inch rectangle below the kite block.
Press seam allowances toward the background rectangle.
Add the 17.5 x 24.5 inch rectangle to the left side of the kite block.
Press seam allowances toward the background fabric.
Using your marker, lightly draw a gentle curve for your kite tail.
(it is hard to see in the photo)
Set your sewing machine for a very tight zig zag stitch, and using your dark colored thread, stitch over your marker line.
Tip: Practice your zig zag on scrap fabric. If it makes your background fabric pucker up, place sheets of paper behind your marker line and stitch right through it. When the stitched line is complete, the paper will peel right off the back of the runner since all the stitching perforates the paper. Easy peasy!
Optional: The kite tail could be made with baby rick-rack or narrow cording.
Add the border sections to the runner. Stitch the 17.5 inch strips to the left and right side, and the longer strips to the top and bottom. The top and bottom strips will probably be a little bit long, just trim them down, using the square ruler to be certain the corners are nicely squared up! Seam allowances on the borders should be pressed toward the borders.
This next step is vital!
Play peek a boo with the Kitty! It's important to keep the quality inspector happy!
Layer the table runner with the batting and backing. Quilt as desired.
I kept it simple with echo quilting using my walking foot. I didn't mark it so it would be a bit free form and breezy. I think the quilting looks a bit like isobars on a weather map.
Make 4 Kite Tail Bows
Take 2 rectangles, place wrong sides together, and stitch with a 1/4 inch seam allowance around the entire rectangle. (You can see this in the photo below.)
Fold the rectangle in half and finger press a crease in the center.
Using a hand sewing needle and a double thickness of thread, take large stitches across the center of the bow. Gather the fabric up tightly and knot the thread. Repeat for all four bows.
Arrange the bows on the kite tail as desired. Pin in place. Using the sewing machine, threaded with neutral thread, stitch the blows to the kite tail. Then back stitch all the way back across the bow so it is secure. Trim the threads.
Binding
Create about 140 inches of binding using your prefered method. Apply the binding to the runner, and stitch down. Press the binding toward the back of the runner and stitch by machine or by hand, whatever you prefer.
All Finished!
Use your runner to decorate your spring time table. Then go outside and fly a kite!
Happy Stitching!