
 |
| The photo above © Sandi - A Legacy of Stitches |
For this tutorial, I began with a pile of mostly blue and white snowflake/snowman themed fabrics. I keep them in a fabric covered box with a lid. I have this thing about "color-coding". The navy fabric with snowflakes that you see in the background is what the box is covered in and so when I want my snow-themed fabrics, I just grab that box. Same for Valentine fabrics which are in a box covered with heart print fabric, St. Pat's in green and so on.
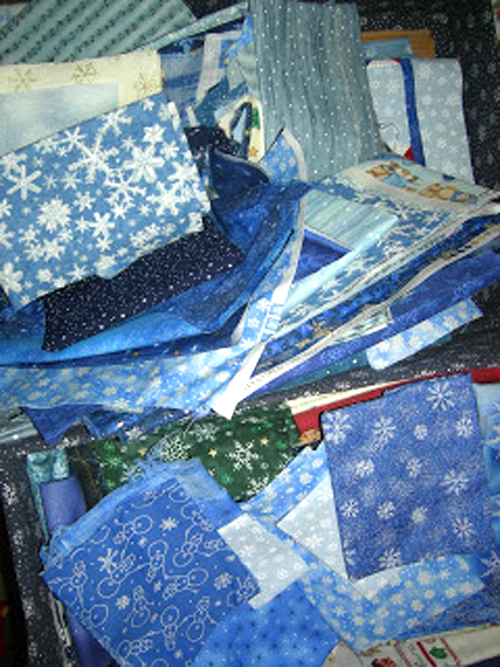
From the fabrics you see in the photo above, I chose several that were in the same blue colorway. Isn't it amazing how there can be so many "color-ways" in fabrics? Blue is blue until you are looking for just a certain blue and then you find you have almost none of it in your stash. This usually means a trip to the fabric store.............but not for this project. I was determined to make it only from fabrics I had in my sewing room stash!
Here are the requirements for this project.....
FABRIC:
1/2 yard fabric that will be your borders and the backing fabric plus miscellaneous fabric scraps for the center block and side panels. Left-over bits from charm packs and jelly rolls work well for this project. Left-over 12-1/2" blocks can also be used for the center of this table runner!
SUPPLIES:
Coordinating thread
Batting 17" x 30" - This can be scraps left over from a larger project and any batting will work. I personally like either Warm and Natural or Quilter's Dream Poly for table runners.
TOOLS:
Rotary cutter, mat, and ruler.
Scissors
and your Sewing Machine!
Once you have selected your fabrics, you can begin to cut. Feel free to change your mind and switch fabrics if needed. I did!

I had always liked the blue and white glittery plaid that you see on the left, so I chose it for my borders. I liked the fat quarter that had those big snowflakes on it but had never found a project that could use them. I found a few other snowflake prints and I was ready to go.
Cut the following pieces:
For the center block, cut four 6-1/2" white squares and sixteen 2" squares of blue fabric.
Cut sixteen 2" x 5" strips in assorted fabrics for your side panels.
Cut the following strips from the fabric that will be used for borders.
Cut 4 strips that measure 2-1/2" x 12-1/2"
Cut 2 strips that measure 2-1/2" x 29-1/2"
Note: at this time, you may also cut your backing piece which will measure 16-1/2" x 29-1/2"

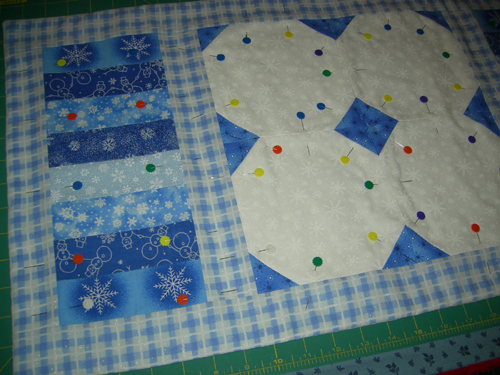
Step 1. Sew the 2" blue squares to the corner of each 6-1/2" white square. Look closely at the photo and you will see that you sew across the square so that a corner triangle is formed.

Step 2. Fold blue fabric back to corner to create a "Snowball" block. Press.

Step 3. Place your four blocks together and make sure your corner triangles will match up fairly closely. :-)

Step 4. Sew the two top "Snowball" blocks together, then sew the two bottom "Snowball" blocks together. Seams on this project are 1/4". Press the seam open on each of these sections. Then sew top section to bottom section and again, press seams open.

The photo above shows how the seams look when pressed open. This makes for nicer quilting when the project is finished. I generally press seams open on small projects as they lay flatter and quilt so much easier this way.

Step 5. Lay out the side strips in a design that pleases you. I had originally chosen to alternate four fabrics, but found I needed another lighter fabric. Sew the strips together into two strips with eight 2 x 5" strips in each side panel. Press seams open on these strips, too.

Step 6. Your center block and side panel strips are complete. It's time to add the borders/sashing. Lay out the pieces and make sure you like the placement of all your fabrics.

Step 7. Pin a 2 x 12-1/2" strip to each side of your center square. Then stitch in place. Remove pins and press. At this point, I now press the seam away from the center block.
Step 8. Pin side panels to the strip that you just stitched to the center square. Stitch and press. Then pin remaining 2 x 12-1/2" strips to edge of side panels. Stitch and press.

Step 9. All that remains to create the table runner top is to add the top and bottom borders/sashing. Pin and stitch the top strip in place. Then pin and stitch the bottom strip. Press and your top is complete.

Step 10. Place the pressed table runner quilt top on your batting. My preferred method is to use Quilt Basting Spray so that my top does not move around when quilting.
If you double-click and enlarge this photo, I believe you can see that I also stitched around the edge of the quilt top. In this case it is so that I will stitch along the same line in this plaid fabric. At this point, I'll share that as much as I loved that fabric, it was awful to work with. It was not "on the straight-of-grain" and I had a hard time getting pieces that aren't skewed. I thought I had all straight pieces and had cut two diagonally and two horizontally when cutting the 2 x 12-1/2" strips. Then I discovered that the plaid squares aren't quite square so I had to use a piece that is skewed on the right side border.

Pinning and sewing on the straight line as much as possible helped this project come out a little better than it was looking mid-way through the stitching process.
Step 11. I used white muslin for the backing. I wanted to use blue fabric, but there was no length of the "right blue" in my stash so I opted for white. Sometimes I sew pieces together to create a backing but I wanted a solid backing for this piece. Place the backing fabric over the top of your finished table runner top. Pin and then stitch around almost the entire perimeter of the table runner, leaving a 6" opening on one side. I like to leave my openings on the bottom edge of any project.

Step 12. With the table runner pieces sewn together, it's time to turn the table runner "inside-out" or is it "outside-in"? :-) Anyway, you know what I mean. I use my Purple Thang, a little tool that I bought several years ago and am so glad that I did! If you do not have one, check your local quilt shop and see if they carry them. It's a great little tool!

Step 13. When the table runner is completely turned out, press carefully and then slipstitch the opening closed.
Step 14. Time for a little quilting. You can do this by hand or machine. I like these extra long pins when I'm quilting small projects. They make the piece lie flat which makes stitching easy.
You can see in the photo, that I am "stitching-in-the-ditch". I chose to do that on the side panels because I really liked the fabrics and wasn't sure I wanted them covered by lots of stitching. In the photo below, you can see that I "stitched-in-the-ditch" around the center square and then I stitched just inside the edge on each of the "Snowball" blocks. It's all done but I may go back and add some hand-quilting in a silvery thread. I'm thinking some curly-Q stitches over the side panels and maybe some snowflakes in the "Snowball" blocks.

I'm going to leave it just as it is right now, because my "winter blues" have been stitched away and because Minnie says she's ready for a nap and wants to use it. I can let her borrow it for a bit because she was so thoughtful to never say a word when I got upset over that skewed plaid fabric. LOL!

FABRIC:
1/2 yard fabric that will be your borders and the backing fabric plus miscellaneous fabric scraps for the center block and side panels. Left-over bits from charm packs and jelly rolls work well for this project. Left-over 12-1/2" blocks can also be used for the center of this table runner!
SUPPLIES:
Coordinating thread
Batting 17" x 30" - This can be scraps left over from a larger project and any batting will work. I personally like either Warm and Natural or Quilter's Dream Poly for table runners.
TOOLS:
Rotary cutter, mat, and ruler.
Scissors
and your Sewing Machine!
Once you have selected your fabrics, you can begin to cut. Feel free to change your mind and switch fabrics if needed. I did!
I had always liked the blue and white glittery plaid that you see on the left, so I chose it for my borders. I liked the fat quarter that had those big snowflakes on it but had never found a project that could use them. I found a few other snowflake prints and I was ready to go.
Cut the following pieces:
For the center block, cut four 6-1/2" white squares and sixteen 2" squares of blue fabric.
Cut sixteen 2" x 5" strips in assorted fabrics for your side panels.
Cut the following strips from the fabric that will be used for borders.
Cut 4 strips that measure 2-1/2" x 12-1/2"
Cut 2 strips that measure 2-1/2" x 29-1/2"
Note: at this time, you may also cut your backing piece which will measure 16-1/2" x 29-1/2"
Step 1. Sew the 2" blue squares to the corner of each 6-1/2" white square. Look closely at the photo and you will see that you sew across the square so that a corner triangle is formed.
Step 2. Fold blue fabric back to corner to create a "Snowball" block. Press.
Step 3. Place your four blocks together and make sure your corner triangles will match up fairly closely. :-)
Step 4. Sew the two top "Snowball" blocks together, then sew the two bottom "Snowball" blocks together. Seams on this project are 1/4". Press the seam open on each of these sections. Then sew top section to bottom section and again, press seams open.
The photo above shows how the seams look when pressed open. This makes for nicer quilting when the project is finished. I generally press seams open on small projects as they lay flatter and quilt so much easier this way.
Step 5. Lay out the side strips in a design that pleases you. I had originally chosen to alternate four fabrics, but found I needed another lighter fabric. Sew the strips together into two strips with eight 2 x 5" strips in each side panel. Press seams open on these strips, too.
Step 6. Your center block and side panel strips are complete. It's time to add the borders/sashing. Lay out the pieces and make sure you like the placement of all your fabrics.
Step 7. Pin a 2 x 12-1/2" strip to each side of your center square. Then stitch in place. Remove pins and press. At this point, I now press the seam away from the center block.
Step 8. Pin side panels to the strip that you just stitched to the center square. Stitch and press. Then pin remaining 2 x 12-1/2" strips to edge of side panels. Stitch and press.
Step 9. All that remains to create the table runner top is to add the top and bottom borders/sashing. Pin and stitch the top strip in place. Then pin and stitch the bottom strip. Press and your top is complete.
Step 10. Place the pressed table runner quilt top on your batting. My preferred method is to use Quilt Basting Spray so that my top does not move around when quilting.
If you double-click and enlarge this photo, I believe you can see that I also stitched around the edge of the quilt top. In this case it is so that I will stitch along the same line in this plaid fabric. At this point, I'll share that as much as I loved that fabric, it was awful to work with. It was not "on the straight-of-grain" and I had a hard time getting pieces that aren't skewed. I thought I had all straight pieces and had cut two diagonally and two horizontally when cutting the 2 x 12-1/2" strips. Then I discovered that the plaid squares aren't quite square so I had to use a piece that is skewed on the right side border.
Pinning and sewing on the straight line as much as possible helped this project come out a little better than it was looking mid-way through the stitching process.
Step 11. I used white muslin for the backing. I wanted to use blue fabric, but there was no length of the "right blue" in my stash so I opted for white. Sometimes I sew pieces together to create a backing but I wanted a solid backing for this piece. Place the backing fabric over the top of your finished table runner top. Pin and then stitch around almost the entire perimeter of the table runner, leaving a 6" opening on one side. I like to leave my openings on the bottom edge of any project.
Step 12. With the table runner pieces sewn together, it's time to turn the table runner "inside-out" or is it "outside-in"? :-) Anyway, you know what I mean. I use my Purple Thang, a little tool that I bought several years ago and am so glad that I did! If you do not have one, check your local quilt shop and see if they carry them. It's a great little tool!
Step 13. When the table runner is completely turned out, press carefully and then slipstitch the opening closed.
Step 14. Time for a little quilting. You can do this by hand or machine. I like these extra long pins when I'm quilting small projects. They make the piece lie flat which makes stitching easy.
You can see in the photo, that I am "stitching-in-the-ditch". I chose to do that on the side panels because I really liked the fabrics and wasn't sure I wanted them covered by lots of stitching. In the photo below, you can see that I "stitched-in-the-ditch" around the center square and then I stitched just inside the edge on each of the "Snowball" blocks. It's all done but I may go back and add some hand-quilting in a silvery thread. I'm thinking some curly-Q stitches over the side panels and maybe some snowflakes in the "Snowball" blocks.
I'm going to leave it just as it is right now, because my "winter blues" have been stitched away and because Minnie says she's ready for a nap and wants to use it. I can let her borrow it for a bit because she was so thoughtful to never say a word when I got upset over that skewed plaid fabric. LOL!
Happy sewing!